

More crocheting with twine! I discovered some gorgeously coloured jute twine by Nutscene recently and couldn't wait to make something with it. I came up with these simple little crochet pots which make perfect containers for spring flowers or anything else you can think of. What about one on the kitchen windowsill for pan scrubbers or your washing up liquid? They'd be useful in the bathroom too I think.

Although the twine is of course waterproof as its meant for use in the garden, I've lined my little containers with recycled yogurt pots. This helps them keep their shape and will stop the bottoms getting soggy if your plant pot leaks or your dishcloth is wet. Only because I'm thinking I might sell these at my next craft fair, I managed to remove the printing on the plastic pot with fine sandpaper but there is no need to do that. I also cut the rim of the pot with a pair of scalloped scissors meant for paper or card to make it look a bit prettier (it doesn't seem to have harmed the scissors either).
These little pots are very quick and easy to make and in case you'd like to have a go I'm going to try to tell you how I made them. Its not a very rigid pattern as it doesn't really matter what size you make them. I do hope you can follow my instructions - if you have any questions please do let me know. I've used UK crochet terms - ie, double crochet is a single crochet in the US.
I used a 5.5mm plastic hook. I started with 5 chain joined into a circle with a slip stitch.
Next round: double crochet (dc) in same chain as slip stitch and then 2dc in each chain (10dc). Do not join the round but put a thread marker at the beginning of the round if you like and carry on in a spiral. This produces a much neater finished project with no nasty round joins visible.
Next round: from now on hook into the back loop only of the stitch. This gives a nice woven look and also as the twine is quite stiff, its much easier on the fingers. *2dc in next stitch; 1dc in next stitch - repeat from * round.
Next round: *2dc in next stitch; 1dc in each of next 2 stitches (remember just the back loop only); repeat from * around. This finishes the base of your container but if you want to make it bigger repeat the last round once more.
Next round: Now to make the sides - 1dc in each stitch repeating around. As you are not joining the rounds but carrying on in a spiral, continue with 1dc in each stitch until you are happy with the height of your container. When you get to the top you will find the rim might look a bit wonky (technical term!) so I slip stitched into a few stitches (about 5 stitches) until the rim looked fairly level.
Next round: To make the decorative scalloped edge, *chain 3, miss one dc, slip stitch into next dc. Repeat from * around and join with a slip stitch into the first chain.
That's it! If you can find the right size, pushing a yogurt pot (or any other sort of pot/container) into the container will stretch the twine a bit and make a nice even shape.

Remember this lovely twine is a garden product and I have to admit I've found it rather tough on the fingers and wrists. Make sure you use a comfortable hook and I think I would only make one or two of these at a time to ensure my wrists don't get too sore.

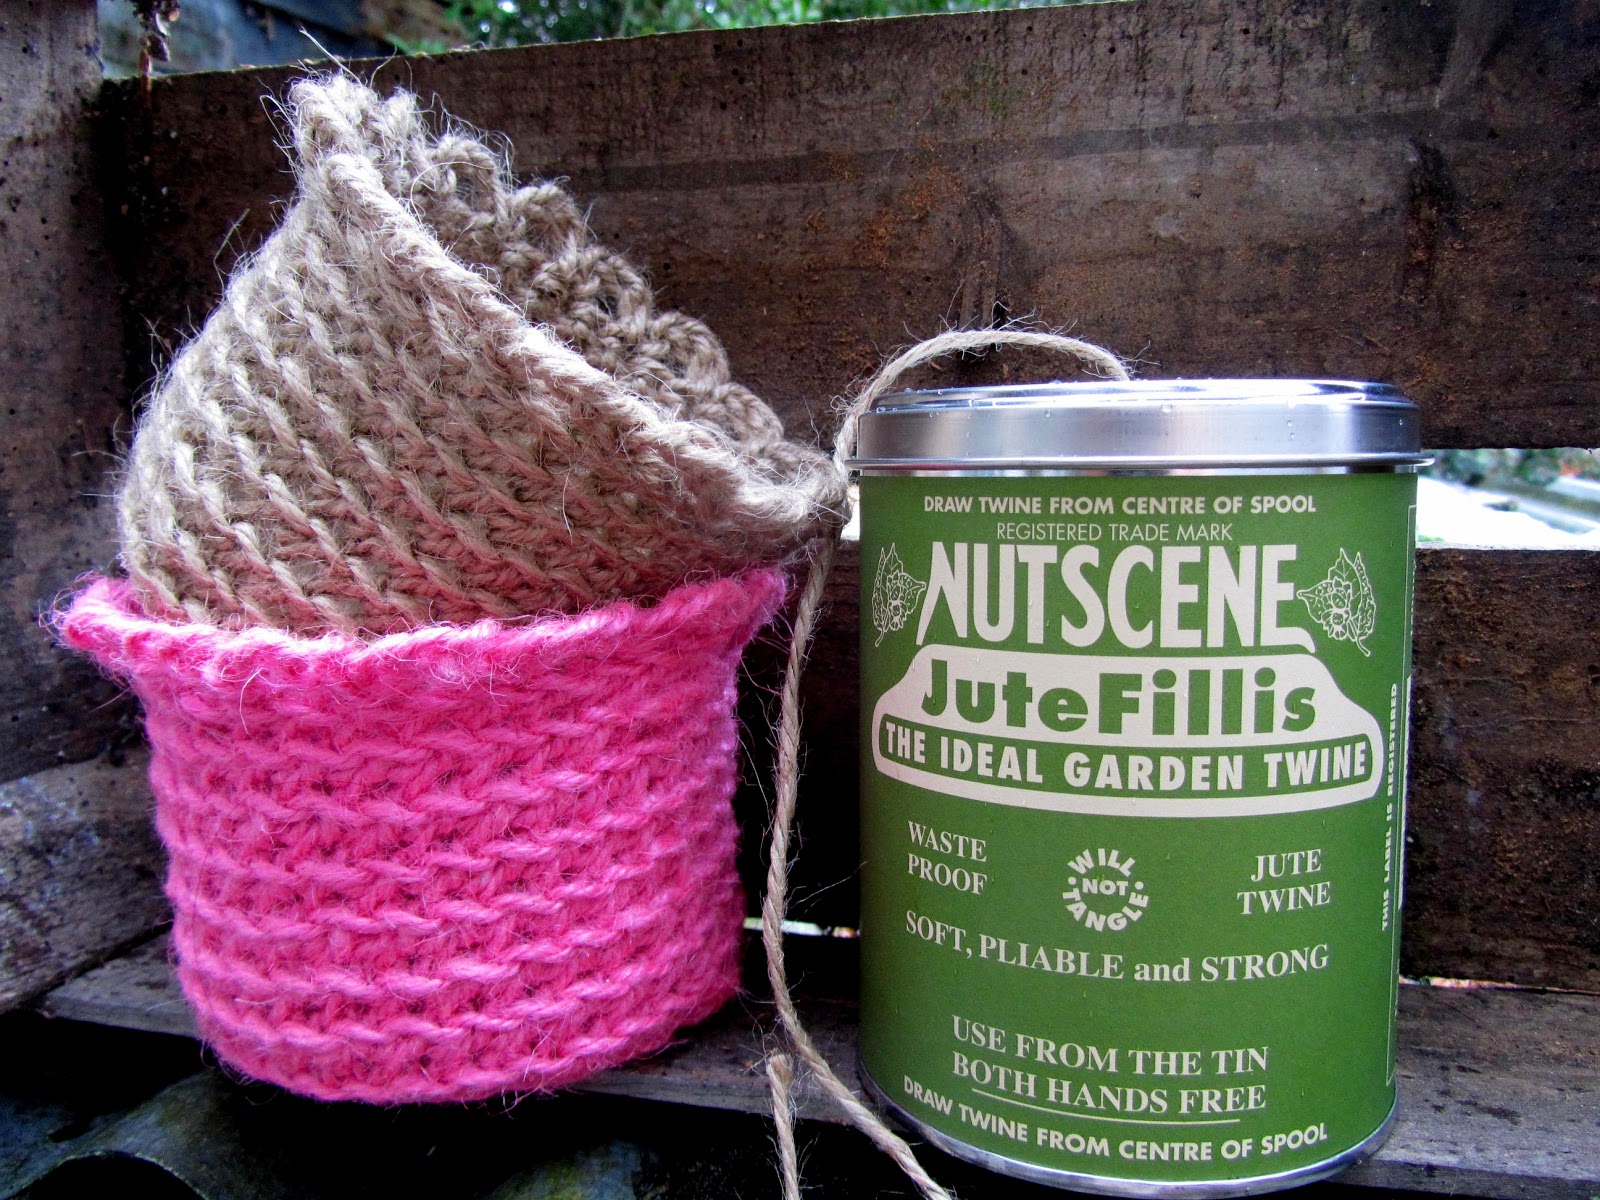
There are other lovely colours on offer from Nutscene and I've already got another three gorgeous shades on their way to me. I think I could probably get three pots out of each spool. As you can see above, I also treated myself to one of the special Nutscene twine tins and as well as being very
decorative it stops the twine twisting up when I crochet.

Of course you can use any twine for your pot but as a keen supporter of "buy local" I like the idea that Nutscene is a traditional British company that produces their string and twine in Scotland on machinery they have been using since 1922. The above spread is by photographer Andrew Montgomery and I think from one of my old Country Living magazines. There are US stockists too listed here, and just for Baukje, here's a link for France. (They have gorgeous raffia too that will be next on my crochet experiments list.)
Please do let me know of my instructions aren't clear. Its my first attempt at writing a pattern out.

Oh Anne, how lovely they are. I looked at their site and tried to order some but they say that they do not deliver to France!!!!! I will try to find them here. Otherwise i come back to you........They are so perfect for the mothers day market !!!!
ReplyDeleteWhat a great idea to use jute! I really love these crocheted pots as well as the yarn ones in your previous post. Thanks for sharing how you made them.
ReplyDeleteLovely pots.
ReplyDeleteJulie xxxxxxx
These are a fantastic idea Anne, I really must learn to crochet. I'm sure they will sell like hot cakes at your craft fair.
ReplyDelete