It seems the only time I'm disciplined enough to write a blog post is when someone asks me to share something I've made, so I have to thank Francey and Lorraine for making me write this. You'll have to forgive me if this doesn't look quite right as my faithful elderly laptop has finally died and I'm writing this on a borrowed machine with a different operating system.
So! I recently posted this photo of a Knit and Go bag on Instagram. My Pinterest feed kept showing me different versions of these handy little bags and as the volunteer sewing groups I've been sewing masks, scrubs, hats, laundrybags, etc, etc for have now closed, I finally got round to making this one. Its quite a simple and quick make, though it will take a bit longer if you decide to add embroidery or other decoration.
Here is the pattern - its a variation on this one from Elena Jorge. I hope the photo is clear enough but if you start with a piece of paper 30cms long and 21cms wide you should end up with something similar to my bag. Use a suitable plate or tub to draw the curve.
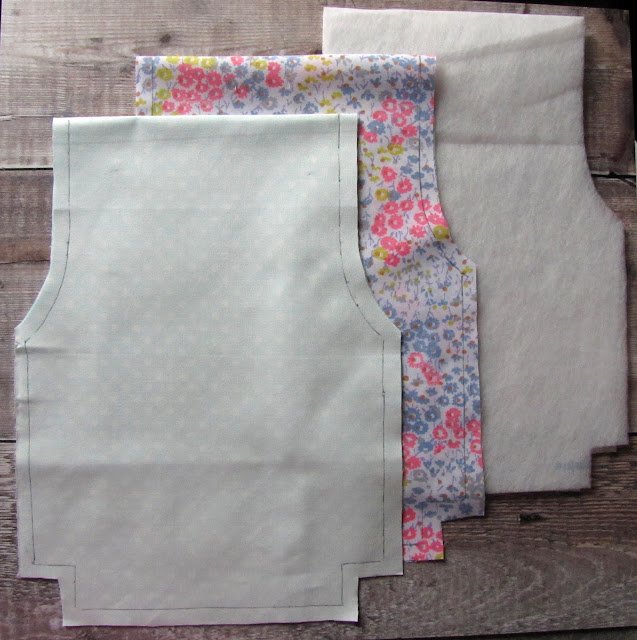
Choose your fabric - remember you will be cutting the pattern on the fold and you need to ADD SEAM ALLOWANCES. I used a good 100% cotton fabric for the outside and a polycotton for the lining. Cut out one outer bag and one lining placing the top of the pattern on the fabric fold. Cut out one in fusible fleece, again on the fold but this time without a seam allowance and fuse it to the back of the outside fabric.
I suppose you don't have to use the fleece - especially if using a sturdy fabric, but it does give shape to the bag, enough for it to stand up on it's own!
And the edge of the fleece makes a good line to follow when sewing. If you are going to add embroidery now is the time to do it. I did some raw edge applique on this bag and hand embroidery on the first one.
Next, place the main piece and the lining piece right sides together and stitch along the two curves of the 'handle' on both sides. Clip the curves, turn through and press. The two sides and the bottom of the bag will be open. You can top stitch the handle edges for a neat finish but start and end the stitching 1cm in from the edge to make the next step easier.
Next, keeping the handle out of the way of your pins, match and pin together the two outer sides and the two lining sides together and stitch right across from A to B on both sides, leaving the notches and bottom seams open.
Make sure the spot where the handle and side seams meet is matched carefully. Its quite difficult to explain but much easier to do!
Next, sew across the bottom seam on the outer fabric, then sew the bottom seam of the lining leaving a GAP of about 8cms in the middle to turn the bag through. The white arrows indicate (not very elegantly) where to stitch.
Lastly, box the four corners matching the seams in the middle, and mark the line with a pencil or fabric marker at the point where the ruler shows 2.5cms each side of the centre line. Stitch the four box corners. Its easier to look at the picture than to explain!!
Now all that's left is to turn the bag through the gap in the bottom seam and hand sew or machine the lining closed.
And that's it. Give the bag a good press. I stuffed the bag with balls of yarn to make it easier to keep the box shape whilst pressing.
Now it occurs to me that I have very skinny arms and these measurements were fine for my arm but if you think a bit more space is needed for the arm you are sewing for. adding about 2 or 3 cms at the top of the pattern, ie the fold line. This will make a bigger side opening.
The bag is big enough to hold two 50gm balls of yarn, plenty to be going on with when out and about. Perfect for knitting and crochet and even small embroidery projects would fit inside.
I'm not very good at tutorials but Elena is and wrote a brilliant one on her blog Momentos de Costura in October 2016. It has excellent photos and is written in Spanish but Google can translate it for you if necessary. Her bag is a different shape to mine but the method of construction is exactly the same and its the method I copied to make my bag. So thank you Elena! I hope you both enjoy making your bags..... and you may want to make more than one - I've made five so far!!!
Ann


Hello Ann, your instructions are very clear and photos show exactly what goes where. Hope you have been keeping well and safe in these worrying times. I have been so thankful for having the garden and the nice weather to be able to spend time in it. I bought a summer house for the end of the garden last October and am so glad that I did as we have spent most of our time sat out in it. Hugs Mrs A.
ReplyDeleteWhat a fantastic idea! Thank you for sharing how you made it.
ReplyDelete